Variable Power Supply
I was working on a low voltage cutoff circuit to protect my new LiPo battery from getting drained down too far. So naturally, I needed to simulate the voltage of the battery draining from Vmax of 8.4 volts down to Vmin of 6.0 volts.
BUT....I don't have a benchtop power supply to test my circuit. So I was messing around with a voltage divider, but I decided that if I want to do this right then I need a variable voltage supply that is a bit more sophisitcated.
I could buy a power supply for less than $100 like this one at Jameco.com. However, I figure I would learn more and maybe save some money if I built one myself. That last bit about saving some money is questionable after I consider adding a microcontroller to monitor current sensing and and drive an LED screen then put the whole thing in a decent enclosure.
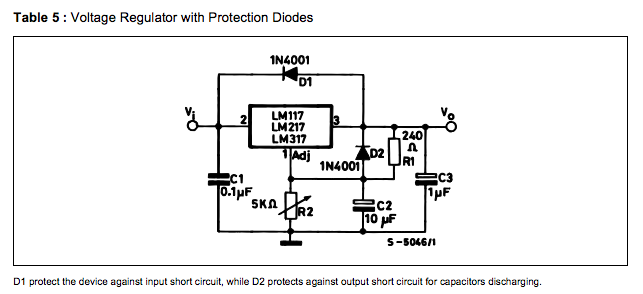
First I'm building this basic power supply around an ST Semiconductor's, LM317T voltage regulator. Check out the datasheet here. From the datasheet I'm building this.
Aug 22 - I was able to build the circuit above and sourcing Vi from two nine volt batteries in series. From this 18V source I was able to use the regulator to smoothly deliver power from 13 volts to 2 volts by adjusting the 5K poteniometer. This should be good enough to continue testing for the low voltage cutoff circuit now that I have a variable voltage power source.
Aug 28 - I used my breadboard based power supply for about a week, and decided to go ahead and solder it up and put it into a little enclosure. I also ordered a better voltage regulator than the LM317 that can handle up to 3A, and I bought a transformer so I could run the project off line power without having to worry about batteries. The components used in this little project are:
- LM350T (datasheet here) at the heart of the regulator
- Radio Shack 6x3x2 project enclosure
- Radio Shack 12V, 1.5A AC transformer.
- 5K linear taper potentiometer (three terminal...only two connected)
- .1uF ceramic disk capacitor
- 10uF electrolytic capacitor
- Radio Shack PC Board Terminals (276-1388)
I like the Radio Shack black boxes because they are a little pliable and I can work them pretty easily with the dremel tool. On this project I cut an openining in the top of the project box to mount the potentiometer and will cut a hole in the bottom to run the line in from the transformer.
The regulator works as designed! I've got some photos to put up and show the process a little more when I get some time.
Some follow on improvements for this basic 2-12V power supply might be:
- Change the 5K linear taper pot for a 5K audio (logarithmic) taper. This should provide a more uniform change in voltage as you turn the knob.
- Get a higher voltage and power rated transformer. Right now the LM305T is rated for 3A, but the transformer will only provide 1.5 on Vin. Similarly, the LM305 can reregulate voltage up to 30V, but the existing transformer can only provide Vin at 12V.
- Get bananna plug connecters for a more standard way of connecting power from the regulator to a project. - Completed on 9/6/13.
- Add an Arduino or other less expensive microcontroller and an LED display to show the voltage dialed up on the regulator.
- Add an on/off switch to the regulator. - Completed on 9/6/13.
- Add a power on LED. - Completed 9/6/13.
- Add a cooling fan